
Hey Proxies! If you want your anomaly team to crank out devastating burst damage in Zenless Zone Zero, Anomaly Proficiency is non-negotiable—it’s the core stat that directly amplifies advanced anomaly effects and shortens their trigger intervals. With high Anomaly Proficiency, you can turn basic anomaly damage into a game-changing burst, which is key to clearing swarms of mobs and breaking through BOSS defenses. That’s why we’ve put together this ultimate guide to help you master Anomaly Proficiency efficiently. And if you need a quick boost to accelerate your anomaly team build, topping up Zenless Zone Zero via LootBar gives you secure, fast resource replenishment—so you can focus on maximizing your burst potential.
Anomaly System Core Attribute Differentiation
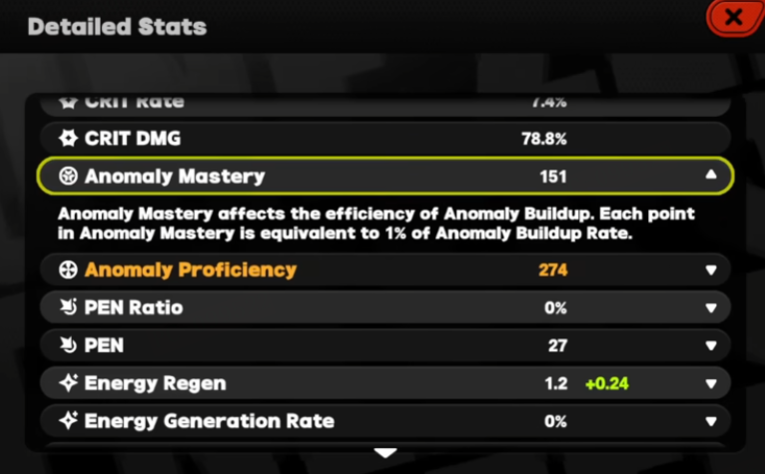
The anomaly system relies on three key pillars: Anomaly Proficiency, Mastery, and Accumulation. You don’t need to stack all three equally, but understanding their distinct roles (and how they synergize) is crucial to avoiding wasted resources. Let’s break them down clearly:
|
Attribute |
Core Function |
Key Value |
|
Anomaly Proficiency |
Amplifies advanced anomaly effects (damage/range) and shortens trigger intervals |
Turns basic damage into burst; core for late-game output |
|
Anomaly Mastery |
Increases base anomaly damage and status duration |
Guarantees basic output; prerequisite for advanced effect triggers |
|
Anomaly Accumulation |
Speeds up anomaly value stacking to trigger basic statuses |
Trigger switch for anomaly effects; fast stacking=more output windows |
Advanced Anomaly Effect: Trigger Rules & Combat Value
Advanced anomaly effects are where your burst damage truly shines—and triggering them isn’t complicated. Follow these rules, and you’ll consistently land high-damage hits in battles:
Trigger Steps
Use high-Accumulation agents to apply basic anomaly status (electric shock/burning/freezing) to enemies
Maintain continuous attacks to keep the anomaly status active for 3 full seconds
Advanced effect triggers automatically; avoid enemy disengagement or status dispelling during the period
Damage Bonus Mechanism
Every 50 points of Anomaly Proficiency=10% advanced effect damage boost. Max-level cultivation (Level 60 + Tier 3 breakthrough) can reach 350+ Proficiency, increasing advanced damage by 70%+. And below are some tips for you.
Group mobs: First use support agents to apply group anomalies, then switch to damage dealers for continuous attacks to trigger area burst
BOSS battles: Target BOSS’s weak anomaly type; equip “Abnormal Duration Extension” emblem to trigger advanced effects multiple times
Immune enemies: Check enemy panels in advance; switch anomaly types promptly to avoid output waste
Anomaly Proficiency Maximization Strategy
To stack Anomaly Proficiency efficiently, follow this priority order—focus on the basics first, then layer on enhancements. This way, you won’t waste resources on low-value upgrades:
Cultivation Priority
The key to efficient Proficiency stacking is to lock in stable, permanent gains first—these are the “base” of your build, and they’re far more valuable than temporary buffs early on. Follow this order to make the most of your resources.
Level core anomaly agents to 60 first; Tier 3 breakthrough unlocks a large number of base Proficiency attributes
Upgrade the “Advanced Anomaly Enhancement” talent branch
Promote agents to high tiers: High-tier promotion provides 40+ additional Proficiency
Effect Stacking Techniques
These are synergetic strategies that amplify your Proficiency gains, turning good damage into great damage. They work best when paired with the base cultivation above, so don’t skip the basics!
Combo setup: “Main Anomaly + Sub-Anomaly” — Main anomaly triggers advanced effects, Sub-anomaly extends control time
Emblem matching: Equip “Advanced Effect Damage Amplification” to enhance Proficiency effects
Burst window: Use support agents’ combo skills to boost team Proficiency temporarily; concentrate burst during BOSS weakened phases
Top-Tier Agent & Emblem Recommendations
You don’t need to test every agent or emblem—stick to these top picks that synergize perfectly with Anomaly Proficiency. They’ll save you time and maximize your burst potential:
Highly Compatible Agents
|
Anomaly Type |
Recommended Agent |
Core Advantage |
|
Electric Shock |
Billy / Anby |
Billy: Chain electric shock Anby: Fast anomaly stacking |
|
Burning |
Burnice |
Advanced fire sea spread; maximizes area damage |
|
Freezing |
Lycaon |
Advanced ice shatter; strong single-target burst |
Core Emblem Matching
Essential: “Abnormal Advanced Amplification” (30% advanced damage boost) / “Proficiency Enhancement” (+40 Proficiency) / “Abnormal Duration Extension” (+2s duration, guarantees trigger)
Alternatives: “Area Expander” (30% advanced range boost) / “Combo Resonance” (higher combo=stronger Proficiency effect)
Common Misconceptions & Problem Fixes
Many players waste resources or miss out on burst damage due to simple misconceptions. Let’s clear these up and fix the most common issues you might face. Common misconceptions can’t get away with these three:
Myth 1: “Proficiency can replace Mastery.” Wrong—you need both to synergize. Mastery ensures your basic anomaly damage is solid, while Proficiency boosts advanced effects. Skip either, and your burst will feel weak.
Myth 2: “I should stack Proficiency on all agents.” Don’t do this! Focus only on your core anomaly damage dealers. Defensive or physical agents won’t benefit much from Proficiency, so save resources for your main team.
Myth 3: “Enemy anomaly resistance doesn’t matter.” Some enemies are immune to advanced effects—always check their panels first. Wasting time stacking a useless anomaly type will cost you battles.
And the best solution to these pitfalls have given to you.
Advanced effects not triggering: Make sure the anomaly status stays active for a full 3 seconds. If it’s dropping off too fast, equip “Abnormal Duration” emblems or reduce frequent agent switches (which can break status uptime).
Advanced damage too low: Prioritize increasing both Proficiency and Mastery—we recommend a 1:1.5 ratio (Mastery: Proficiency). Also, check your emblems: if you’re using niche picks instead of the essential ones, switch to boost damage.

Conclusion
Mastering Anomaly Proficiency boils down to three simple things: understanding the roles of each anomaly attribute clearly, cultivating your core agents targeted, and applying the right strategies to each battle scenario. Stick to these principles, and you’ll fully unlock the burst potential of your anomaly team.
To accelerate your Anomaly Proficiency build—whether unlocking core agents or collecting emblem materials—Zenless Zone Zero top-up via LootBar is the efficient choice. With secure, encrypted transactions, ultra-fast payments, and 24/7 professional customer service, LootBar provides reliable support, helping you quickly maximize your anomaly team’s combat power and dominate all ZZZ battles.